Saturday, March 12, 2022

TUTORIAL: NO BRAINER BLOCK

  Alma Day’s

“No Brainer Block”

String Piecing Has Never Been So Easy!


Hello everyone.  We have been having many requests for this tutorial.  Alma is not online so I am putting this together with her permission and approval. 

January was our class at White Eagle Grange.  The hardiest of our members came out and we had a blast with much humor and not a little reflection!   This block is original to Alma.  There was only one other block that was even close.  String piecing is so random, it is hard to identify whether it has even been made before.  Alma and her friend Jeanne have a home for their string quilts with “Children In Crisis”  These bright and cuddly quilts go to kids who need a bright spot in their lives. 


February has found us all pulling fabric from our group stash at Rocky Ridge Quilters, cutting 1½, 2½ inch blocks and strings. Any strip from ¾ of an inch to 2 ½”.  To think that many of these smaller pieces are given to us so we can carry out our “Community Quilt Chest”!!! We keep a number of quilts of all sizes for folks who have had an emergency (fire etc) And are ready to gift them with a little warmth. 


About The Quilt:  It can be done in any size, the designing is up to the maker.  Alma wanted 8½ inch blocks but after I had all the muslin foundation cut (100 blocks) she thought maybe 9 inches would have been better.  ANY size will lend itself to this block.  One of our members was stressing a bit and Alma explained that you just grab blocks and strips and sew.  It is a NO BRAINER!  LOL  Thus the block name. 


Tools and Fabrics:

Cutting and pressing mats

Random fabrics, brights, and lots of contrast between light, bright and dark colors will be needed. 

For each block you will need a muslin foundation in your block size. 

7- 2 ½ inch squares

A stack of light and dark color value strips as well as bright strips on either side of the single row of blocks.

A marking utensil to mark 2 lines for keeping your blocks in line. (pencil works fine)

A sharp pair of scissors for trimming thread and small bits of fabric.  (I like Fiskars Razor Edge Shears or Karen Kay Buckley Scissors) 

Rotary cutter and an appropriate size ruler to cut your strips and square your block.


NOTE: Do not throw away your trimmings, they will fit in MANY places on blocks yet to be created.  Bring a small tray, basket, etc… to keep your scraps tamed as you work on your blocks. 


“Hints” to think about to make your block stand out!  There are no rules, only strings and blocks 😊

Do NOT cut blocks from the same fabric as you cut strips from.  It can be visually confusing.  This helps each element stand out. 

Start your squares with a dark value 2 ½ inch square for the middle.  As you extend out, alternate light and dark and bright ending your strip of squares with a light.  This is optional, but if special sashing is used it helps the secondary design in the sashing really stand out. 

If you are just wanting to string piece???  Go with what you love, let ‘er rip tater chip! (whoops that was another class!) 😊  


Step 1:  Cut your muslin squares, and we’ll get our foundations set up. Left:  a blank foundation.  Take a pencil or other marking utensil and your ruler.  Draw a guideline diagonal from one corner to the other.  Turn the ruler to the other two corners and make 3 inch or so registration line across the middle of the first line.


Choose 7- 2 ½ inch blocks for your center strip:

Fold your center square in half each way forming quarters and press on the corner where the center of the block will lie.


Open the center block and line up as shown with the registration line.  Open and press lightly. 


Pick your next two blocks that will go on either side of the center block.  PRETTY SIDES TOGETHER PEEPS!    Do a simple ¼ inch seam across the top.   IT IS VERY IMPORTANT TO PRESS AFTER EACH SEAM!!!  Rumples can be a kill joy when piecing on a foundation.


On each corner there is just a ‘tiny’ tip to cover, go ahead and cover it with a square.  Looking a little snakey or wonky?  Don’t stress.  If you have trouble ‘eyeballing’ things just finger press the blocks in half as you go along.  Remember, there is a quarter of an inch seam coming up on each side of these blocks.  Once again PRESSING EACH SEAM IS ESSENTIAL!!!  


NOW FOR THE STRIPS: 

Remember to alternate lights and darks and bright prints. Strips can be any width from ¾ inch to 2 ½ inches in width.  Release your color sense and let creativity happen!

Carefully line up the strip right sides together over the row of blocks. (This is the place where the ¼ inch seam can be an equalizer)   Again with the “cat noses” on the corners.  Cover them just as you did at the end of the row of blocks.  Does #3 look wonky to you???  Yep… but NO WORRIES No Brainer Friends!  The block will be trimmed up in a jiffy! 


The back of the block should be devoid of thread ends… snip those puppies OFF!  Back of the block should be as neat as the front. 😊 

I usually leave an 1/8 to a ¼ inch when cleaning up the edges of the blocks. 


Finished Block and Finished Block with a few scraps.  😊   I LOVE CRUMBS!


Thanks for playing along with us!  If you have questions, feel free to contact me on Rocky Ridge Quilters group on Facebook, via messenger, or email me at karenmarlenefulbright@gmail.com


Sunday, March 6, 2022

SCRAPALICIOUS 2022 and STEPPING OUTSIDE THE BOX


 All of us at Rocky Ridge Quilters are entering the 3rd month having stepped out of the box.  There are a lot of scraps that have accumulated.  The goal is to use the scraps, and fill our 'Community Quilt Chest"  

Stepping outside the box is never easy, so kudos to the brave who are diving in on the 2022 adventure.  I am personally trying to manage my time in smaller increments to get a bit of a handle on having such a heavy load on my plate :D Just 15 minutes a day, and generating activity.  6 days a week!   Leaving my machine set up and ready to use when I can sit down and take note :)  My butt has become far to happy with my reclining loveseat <3    

March will be featuring a new pattern.  So far, January was a class on the "No Brainer Block" designed by our very own Alma Day.  February was working to master the block, the scrappy-ness and color values :)   

This was my block from start to finish for the written tutorial after the class.  The tutorial was shared with local and distance members of our Facebook Group.  

SCRAP ON!   

K.


Sunday, September 20, 2020

Our Pacific NW In Shambles


Talent, Oregon


This post is coming straight from my heart.  As a victim of devastating loss, I feel this all the way to the core of my being. In my loss in 2001,  there was our wedding quilt from my mama, first attempts at quilting for myself, an unfinished top she had given me to complete and my whole stash, machines from my grandma.. etc...  so much is lost in a fire.  I know the pain of losing family items.  

I will be recreating mama's unfinished top after all these years and it will be gifted.  Healing for me and healing for the person who will be gifted.  Win win. 

I would like to encourage anyone who has a project that has been hanging out... send your tops to this amazing group of longarm quilters who are stepping up to the plate in the face of devastation of total cities.  Currently loss of homes is uncounted, and nearly a million acres of Oregon burned as of Sept. 15.  


Near Sublimity, OR


I am sharing this project with all of you out in the land of blogs.  Nancy of OnPoint TV first shared, but as a fellow Oregonian I am posting for our Pacific NW Quilters and those who follow this blog.  

This is from Lynn Lockard from Oregon;


"Here in Oregon all the fires. 6 of us longarmers have gotten together asking for donations of quilt Tops. Laps baby, and anything bigger is fine.
We will quilt them. We decided to wait until Dec . To have places set up for the families who lost everything in the fire, to choose which one they want. Everyone's names who donated quilt tops, finished quilts, backing or batting will be published.


Do you know of anyone who would like to contribute?
Or anyone i can reach out to?
I was level 2 on the Beachie Creek fire. Very unnerving and now we are safe. Its been amazing, several firefighters from different States are here, makes me cry, these men and women putting their lives on the line.


Thank you so much."

If you are interested here is her email if you need more information gramyxseven@gmail.com and her address for sending a quilt top or two - maybe something you made a while back with no purpose in mind and would like to have it go to help comfort someone that has lost everything 
Lynn Lockard
236 SE Church St, Sublimity, OR 97385

Wednesday, October 18, 2017

HOW BUSY CAN A GRANDMA GET?

Hi All!  How busy can a grandma get?  Well this Mamaw has been burning the candle at both ends!  Lots of heart projects... Denim For Vets, quilts to be completed for my family, beginner quilting classes are in the works...  It is great when life is being LIVED!  

Thanks for hanging in there with me, as sometimes online stuff takes a backseat to real life. 

I just completed a handout for those who would like to read about fabric precuts, and also "how many blocks do I need?....  "  Bed sizes anymore are suggestive only... LOTS of odd sizes out there! 

Measure where you want the quilt to go, if you are aiming from a decorating standpoint.  I would recommend keeping it 100 inches either way or less.  Quilts that big are going to fit just fine on 108" backing, eliminating the need to piece your quilt back.  Cost effective and will fit on the long arm frame just fine. 

Tab is going up after this post!  Photo:  Ruler work by Amy Johnson

Monday, September 25, 2017

Identifying An Antique Quilt Pattern

             Identifying An Antique Quilt Pattern

One of our quilting group members shared a gorgeous family heirloom with us last week.  Annette wanted to know what the pattern was.  We thought perhaps it was something with Lemoyne Star.  

Seems that the basic part of a pattern is used, and often embellished, then given a totally different name.  So out came the reference books.  
Family Quilt Circa early 1930's Shared By Annette Hoeft


Updated and Modernized version of the quilt.  
StarFlower Blocks Courtesy of Sarah Eischen, Tammy Coiner, Toni Devine and Karen Fulbright.  (photo by Karen Fulbright)

These next two photos are excerpted from the book:  The American Quilt Story  The How-T and Heritage of a Craft Tradition  By Susan Jenkins and Linda Seward.  (I will bring this for everyone to enjoy on Thursday)   
I got very excited when I ran across this one... not exactly the right pattern, but on the right track.  This is circa 1860, made at a "Bee" in the north to raise funds for the Union Cause.  
This "Snow Crystal" quilt was made in Oklahoma in the 1920s.  Love the dark blue sashing with white cornerstones.  The blue/white colorway is reminiscent of mosaic or maybe Arabic tiling... 

After much searching, the pattern was found.  It is called "Snow Crystal"  
It was indeed started with a "Lemoyne Star"  (from Pinterest)


So....  What is the difference between all these star patterns.  Having just finished a big block quilt with the "Starflower" block, I was curious.  Our Starflower was an eight point star done entirely with whole blocks in the corners and in everything else (the star itself) done with half-square triangles.  

The specific difference in these two types of blocks is that the Lemoyne Star has diamonds and triangles and squares, requiring advanced setting skills and "Y" seams.  If you look carefully at the construction of the individual units you can see that the diamonds in one piece are more elongated, and the triangle between each set of star points is considerably shorter than a half-square triangle, requiring the dreaded "Y" seam to connect the units.  

Starflower units of half square triangles are more evenly balanced and require less finesse in the piecing... lending themselves wonderfully to chain piecing and quick construction. 

So hats off and a toast to the "SNOW CRYSTAL"  a peek back in time! 


Sunday, May 7, 2017

Krazy Horse Quilters 2017 Quilt Show

Holy Cow... I was not prepared for the NUMBERS!  Lots of quilts.  Shout out to the featured quilter Joyce Dean Gieszler!  Had a very nice visit with her and enjoyed her display.  Sharing some snaps here: 


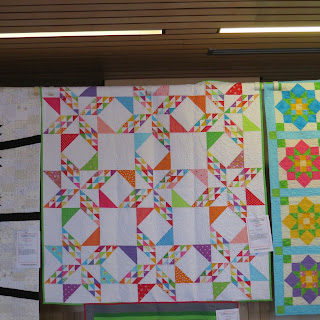
I always love seeing the same pattern in different colorways. "Safe Travels" (top) and "Grandma's Surprise" (bottom)are pictured here.  I was surprised to find someone who ENJOYED math (my total nemesis) and said a little "Bless your heart"  LOL!  Meant in the nicest southern way... I can't imagine what it would be like to be good at math... but we did get a chuckle out of my amazement... (NOW I know who to call when I get stuck)

Joyce has a couple of VERY nice books out, very well done and at this point I was confident that the math would be right... hahaha...  Please check out her blog and store HERE:  
  http://www.quilterchickdesigns.com/ 

I added "Fantastic Stash Quilts"  and "Then and Now Quilts" to my library.  I'm thinking they will become dog-eared favorites! 

Here is the rest of Joyce's display.  LOVE the vibrant colors and great staging.  Enjoy peeps!
Betsy's Quilt  (pattern in Fantastic Stash Quilts)

I was thinking a pot of tea might be nice... LOL!  So fun!


Bending The Rules

Spinning Triangles

"Challenge"

Two "Safe Travels"" quilts, different colorways.


"Pineapple"

"CrossRoads" pattern in Then and Now Quilts

"Grandma's Surprise"


"Dutch Friendship"
Just wish my photography could capture how vibrant these colors are...  GORGEOUS work. 


Thanks to Joyce for her patience in answering my questions... 

This is a MUST see show each year!  Lots of vendors and a fun time visiting with folks who will share your passion for beautiful quilts!